Friday, July 1, 2016

How to create a poplist item in OAF

To create a poplist item, you need a VO which would display the values in the poplist. Lets say we want to display a poplist which would display the values "Yes", "No" in the poplist.

  • Create a VO which would bring these values from the FND_LOOKUP_VALUES
    Path: xxeee.oracle.apps.ak.test.poplist.server.EnabledFlagVO
    Add this new VO to the main AM

                                           
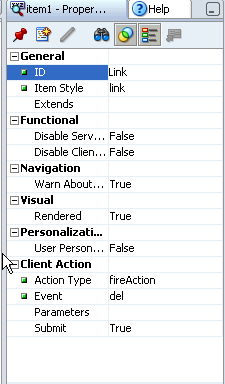
  • To use this VO, Create a new item in the Main Page with the Item Style as "MessageChoice"
  • Item Id: EnabledFlag
  • Select the appropriate data type
    Picklist View Instance:.EnabledFlagVO1 (This is the instance which populates the values in the
                                            poplist.
    Picklist Display Attribute: Meaning (This is the attribute from Poplist VO which would display
                                                the value in poplist
    Picklist Value Attribute: Code (This is the attribute value you would like to save in the database for
                                              for the main page)
    View Instance: This is the view instance of the Main Page from poplist item is being used.
    View Attribute: This is the attribute which would hold the value we chose from the poplist.
  • If you want to have a blank value displayed in the poplist, Set the "Add Blank Value" in the item properties to True.
  • If you want to display a specific value initially in the poplist when page is rendered.
    Set that value attribute in the "Initial Value" property.


Tuesday, February 28, 2012


How to create a external Lov region for Lov Input in OAF

Lets say you want to create a Lov Input for the Item "State" which would be used to select the states in USA while entering the Address.
For this first you would need a VO which would get all the States for USA.

  • Create a VO with the Select statement which gets all the USA States from the lookup
    Path: xxeee.oracle.apps.ak.test.lov.server
  • Create a new AM to attach the above created VO and then Attach the VO to the AM as shown below (Path: xxeee.oracle.apps.ak.test.lov.server.StatesAM)
    To attach the VO to AM: Select the StatesVO on the Left Side (Available View Objects) and Click on the Arrow as show below to move it to the Data Model side. This will create a new View Instance StatesVO1 of the parent object StatesVOFrom here on we will be using this new instance which is attached to the AM not the Parent VO (StatesVO).

  • Now we have the VO to get the LOV Details is ready and AM to hold that VO is ready. Then we need an Independent Region which would be used to display the details for this LOV and Controller for that Region. To Create a new Region, Right Click on the Package and Select "New"
  • OA Components --> Region (Path: xxeee.oracle.apps.ak.test.lov.webui)
  • Give the following properties to the Header Region (Top Region)
     1) Region Style: listofvalues
     2) AM Definition: xxeee.oracle.apps.ak.test.lov.webui
    Leave the other details to default  values
  • Right Click on the StatesRN and Navigate New --> New Region
    Assign the following properties to the New Child Region
     1) ID: MainRN
     2) Region Style: table
    Leave all other details to default.
  • Right Click on the MainRN and Navigate to Create 2 new items with the following properties
    Item 1:
     
    1) ID: StateCode
     2) Item Style: MessageStyledText
     3) Search Allowed: True
     4) Sort Allowed: True
     5) Datatype: VARCHAR2
     6) View Instance: StatesVO1
     7) View Attribute: LookupCode
     8) Prompt: State Code
    Leave all other values to default.
    *****************************
    Item 2:
     
    1) ID: State
     2) Item Style: MessageStyledText
     3) Search Allowed: False
     4) Sort Allowed: True
     5) Datatype: VARCHAR2
     6) View Instance: StatesVO1
     7) View Attribute: Meaning
     8) Prompt: State
    Leave all other values to default.
  • Two important properties in the above Region Items
    1. Search Allowed: For the Item when this Property value is set to True, In the LOV region when opened, User will be able to Search based on the Item.Let's say we have set the property to True for item "StateCode". So when the LOV Region is opened, we will be allowed to search based on the State Code as show below
                                 
    Because we haven't set the Search Allowed Property to True for Item "State", it is not showing up in the Search By Poplist.
    2. Sort Allowed: Sort Allowed Property will let the user sort the data by selected Column whose "Sort Allowed" property is set to True
  • Now our Region is Ready. Next Right Click on the Top Region and Select "Set New Controller"
    Path: xxeee.oracle.apps.ak.test.lov.webui.StatesLovCO

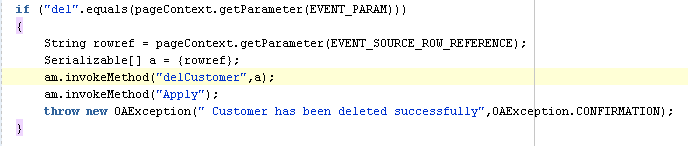
    In the ProcessRequest Method of the Controler Include the following code as shown below, So that query is executed and data is populated in the LOV Region when clicked upon.
  • Create a new item in main of the page in which you want to see the LOV region.Set the item style to MessageLovInput. As soon as you change the item style, you will see a new region under the Lov item. Also you will find a lovMappings item created along with the region.You can delete the new region created by Lov as we would be using the External Region to display Lov values.
    Set the following properties as shown below for the Lov Item.

  • To use the External Lov region populate the External Lov field with the Region that was created previously (Complete Path). Set the Sort Allowed propety to "No"
  • Click on the lovMap1 created under LovMappings. Set the appropriate id for the lovMap1.
    Following properties are important for this lov to work.
    LovRegionItem: This is the value that you want to store in the database or use from the Lov region.
    ReturnItem: Give the Item ID from the current region where you want to have the value from the
                          Lov stored.
    CriteriaItem: Give the same value as ReturnItem.

  • Rebuild the page and run the page to have the Lov displayed next to the "State" Item in the page

Delete Icon Next to a Row in Advanced Table

Delete Icon will be used to delete a row in the Advanced Table. An Icon can be handled in the Table after all the columns and when Clicked upon this Icon, would delete the entire row from the Table and DB. To achieve this functionality, we need to perform the following steps.
1. Create an Advanced Table and All your Columns required in that Table.
2. To be able to display the Delete Icon at the end, Right Click on the Advanced Table --> New --> Column
3. Right Click on the New Column created and Select --> New --> Item
    Set the following properties to this Item..

4. Right Click on Column Components --> Select Sortable Header 
5. Click on Sortable Header and in the Properties set the Prompt as "Delete".
Now we have the Front End Icon is ready. If you run the Page, You will be able to see the Icon in the End of the Columns of the Table. Now we need to Handle this Event in back end to delete the row next to the Delete Icon pressed.

6. Write the following code in the ProcessFormRequest method of the Page Controller.
7. Include the following code in the AMImpl,java file of the Attached AM.

Rebuild the project and Run the Page. You should be able to delete the Row When Clicked on the Delete Icon next to that row.       

OAF Switcher Region: How to use it?

A Switcher region can be used to dynamically switch between the items to be displayed in a table or region.
This is similar to a CASE Statement in SQL. Depending on the input to the Switcher Region, it will display the items under the region.
Lets say, we have a requirement where we need to display Delete Icon as Enabled when Employee is In-Active and Delete Icon as Disabled when Employee is Active as shown below.
To Achieve this, We need to Create a Switcher Region in the Table where you want to display the Delete Icon. If you are using an Advanced Table, Follow the below Steps.
In the VO which populates these rows, make the following changes,
1. Create a Pseudo Column in the Query which returns "Delete_Disabled" or "Delete_Enabled" based on the Status value "Active" or "In-Active".
2. Once the SQL Statement is modified in the Query, DeleteSwitch Item is going to is going to return one the se 2 attributes as Inputs to Switcher Region ("DeleteDisabled" or "DeleteEnabled")

                                        
Now make the following changes in Page or Region
1. Create a New Column under Advanced Table where you want this Delete Icon to be displayed.
2. Right Click on the New Column that was created and Select New -- Switcher
3. Set the following Properties to the Switcher Region.
          ID: DeleteSwitcher
          Region Style: Switcher
          View Attribute: DeleteSwitcher
4. You will notice a new <case> item being created under the Switcher Region.
5. Set the following properties to the First Case Item.
          ID: DeleteDisabled
          Item Style: image
          Prompt: Delete
          Image URL: deleteicon_disabled.gif
          Rendered: True
6. Right Click on Switcher Region and Select New -- Case
7. For the New Item, Set the following Properties
          ID: DeleteEnabled
          Item Style: image
          Prompt: Delete
          Image URL: deleteicon_enabled.gif
          Rendered: True
8. Make sure you are giving the ID of the Item exactly matching with the View Attribute value being returned    by the DELETE_SWITCHER in the Sql Query of VO
9. Test run you page and you will notice that records with Status as "Active" have the Delete Icon Disabled and Status as "In-Active" have the Delete Icon Enabled.

Error "Each row in the Query Result Columns must be mapped to a unique Query Attribute in Mapped Entity columns" while extending a VO

I was trying to extend the seeded iProcurement VO “ReqsApprovalsVO” with out adding any custom attributes.


When I clicked “Next” button on the Step 4/7 (Attribute Mappings), I hit this roadblock which keeps saying “Each row in the Query Result Columns must be mapped to a unique Query Attribute in Mapped Entity columns” and does not let me extend the VO after this.

I thought of several reasons which could be causing this error. I thought it had something do with the file version of the seeded VO I am trying to extend or it could be due to the jDeveloper version I am using.
I ruled out all the possibilities one by one including the jDeveloper issues. Then I looked in metalink and one of the notes gave me a little clue which would solve my issue.

Source: Metalink Note: 1524622.1

I went back to the seeded VO to see if any of the attributes are having this issue. Right Click on “ReqsApprovalsVO” 
àEdit ReqsApprovalsVO
I found this attribute OrgId which is “Mapped to Column or SQL” and has the Query column as “OrgId”

When I verified the SQL Statement for this VO, OrgId attribute has been pulled as “Org_Id” in the query which is not same as “OrgId” and this explains me why the error has been occurring when I am trying to extend the VO.

To resolve the issue, I changed the OrgId to ORG_ID in the seeded VO and was able to extend the VO there after.

FND_REQUEST.ADD_LAYOUT for Setting Layout options for a Concurrent Request


Using FND_REQUEST.SUBMIT_REQUEST, Concurrent Request can only be submitted as a request and any layout options or print options cannot be added to the request. To be able to set the layout options for a request a separate function FND_REQUEST.ADD_LAYOUT needs to be called before calling the SUBMIT_REQUEST. This will be useful while calling a XML Publisher Report Concurrent Program is being submitted from another Program.

fnd_request.add_layout (template_appl_name   => 'Template Application',
                                             template_code        => 'Template Code',
                                             template_language    => 'en', --Use language from                   template definition
                                             template_territory   => 'US', --Use territory from template definition
                                             output_format        => 'PDF' --Use output format from template definition
                                            );

Monday, June 27, 2016

xml commands

Seq
Feature
Command
1
Choose
<?choose:?><?when:ABSENCE_DAYS=1?> 
(Any logo for EX)
<?end when?><?when:ABSENCE_DAYS=2?>
(Any Word for EX)    2 Days   
<?end when?><?end choose?>


2
If (Change field color)
<?ABSENCE_DAYS?><?if:ABSENCE_DAYS=1?>  <xsl:attribute  xdofo:ctx="block" name="background-color">red  </xsl:attribute>  <?end if?>

If (Change Record but this code in Key)
<?if@row:ABSENCE_DAYS=1?><xsl:attribute xdofo:ctx="incontext" name="background-color">green</xsl:attribute><?end if?>

If-Then-Else
<?xdofx:if ABSENCE_DAYS = 1 then 'x' else 'VV'end if?>


3
Column Format
<?if@column:ORGANIZATION_NAME="Access Network Development"?>
Column Name
<?end if?>
4
Variable (set & get)
<?xdoxslt:set_variable($_XDOCTX, 'x', 1)?>  <?xdoxslt:get_variable($_XDOCTX, 'x')?>

Add 10 to Variable x(code in Key)
<?xdoxslt:set_variable($_XDOCTX, 'x', xdoxslt:get_variable($_XDOCTX,'x')+10)?><?xdoxslt:get_variable($_XDOCTX, 'x')?>  


5
Page break
<?split-by-page-break:?>


6
Header & Footer
Header
<?start:body?>
                         Report Body
<?end body?>
Footer


In header <?call:customheader?>
In footer <?call:customfooter?>
In bage body
<?template: customheader?>
Here our header
<?end template ?>
<?template: customfooter?>
Here our footer
<?end template?>
Report Body


7
Page Total
<?ABSENCE_DAYS?><?add-page-total:XXCPX;'ABSENCE_DAYS'?>  (of calculated field)


In the footer to appear in every page
Sub Total Absence Days per page : <?show-page-total:XXCPX;'#,##0.00'?>


8
Run accumulative Total for column
Before the table define variable in the Key

<?xdoxslt:set_variable($_XDOCTX, 'RTotVar', 0)?>

Delete table End code and create new column the set in the Key

<?xdoxslt:set_variable($_XDOCTX, 'RTotVar', xdoxslt:get_variable($_XDOCTX, 'RTotVar') + ABSENCE_DAYS)?><?xdoxslt:get_variable($_XDOCTX, 'RTotVar')?>


9
Forward & Carry Forward
Before the table
<?init-page-total: EntAmt?>

In the table
<?ABSENCE_DAYS?><?add-page-total:EntAmt;ABSENCE_DAYS?>

After the table
<?end-page-total:EntAmt?>

In the Header in the Key code
<xdofo:inline-total display-condition="exceptfirst" name="EntAmt">Brought Forward: <xdofo:show-brought-forward name="EntAmt" format="99G999G999D00"/></xdofo:inline-total>

In the Footer
1-      Get page total
<?show-page-total:EntAmt;"99G999G999D00"?>

2-      Get Carried forward in the Key code
<xdofo:inline-total display-condition="exceptlast" name="EntAmt">Carried Forward:   <xdofo:show-carry-forward name="EntAmt" format="99G999G999D00"/></xdofo:inline-total>

gl interfaces

Oracle GL Daily Conversion Rates Details

This interface lets you load the rates automatically into General Ledger.

Pre-requisites:       Currencies
Conversion rate Types

Interface tables:
GL_DAILY_RATES_INTERFACE

Base tables:
GL_DAILY_RATES
GL_DAILY_CONVERSION_TYPES

Concurrent Program:You do not need to run any import programs. The insert, update, or deletion of rates in GL_DAILY_RATES is done automatically by database triggers on the GL_DAILY_RATES_INTERFACE. All that is required is to develop program to populate the interface table with daily rates information.

Validations:             Check if FROM_CURRENCY and TO_CURRENCY are valid.
Check if USER_CONVERSION_TYPE is valid.

Some important columns that need to be populated in the interface tables:
 GL_DAILY_RATES_INTERFACE:
 FROM_CURRENCY
TO_CURRENCY
FROM_CONVERSION_DATE
TO_CONVERSION_DATE
USER_CONVERSION_TYPE
CONVERSION_RATE
MODE_FLAG (D= Delete, I = Insert, U = Update)

INVERSE_CONVERSION_RATE

Oracle GL Budget Interface Details

Budget interface lets you load budget data from external sources into Oracle Applications.

Pre-requisites:Set of Books
Flex field Value sets
Code Combinations

Interface tables:
GL_BUDGET_INTERFACE

Base tables:
GL_BUDGETS
GL_BUDGET_ASSIGNMENTS
GL_BUDGET_TYPES

Concurrent program:
Budget Upload

Validations:
Check if CURRENCY_CODE is valid.
Check if SET_OF_BOOKS_ID is valid.
Check if BUDGET_ENTITY_NAME (budget organization) is valid.

Some important columns that need to be populated in the interface tables:
GL_BUDGET_INTERFACE:
BUDGET_NAME NOT
BUDGET_ENTITY_NAME
CURRENCY_CODE
FISCAL_YEAR
UPDATE_LOGIC_TYPE
BUDGET_ENTITY_ID
SET_OF_BOOKS_ID
CODE_COMBINATION_ID
BUDGET_VERSION_ID
PERIOD_TYPE
DR_FLAG
STATUS
ACCOUNT_TYPE
PERIOD1_AMOUNT through PERIOD60_AMOUNT
SEGMENT1 through SEGMENT30

Oracle GL Journal interface Details

This interface lets you import journals from other applications like Receivables, Payables etc to integrate the information with General Ledger.

Pre-requisites:
Set of Books
Flex field Value sets
Code Combinations
Currencies
Categories
Journal Sources

Interface tables:
GL_INTERFACE

Base tables:
GL_JE_HEADERS
GL_JE_LINES
GL_JE_BACTHES

Concurrent Program:
Journal Import
Journal Posting — populates GL_BALANCES

Validations:
Validate SOB, journal source name, journal category name, actual flag
A – Actual amounts
B – Budget amounts
E – Encumbrance amount
If you enter E in the interface table, then enter appropriate encumbrance ID, if
B enter budget id.
Check if accounting date or GL date based period name is valid (i.e., not closed).
Check if accounting date falls in open or future open period status.
Check chart of accounts id based on Sob id.
Check if code combination is valid and enabled.
Check if record already exists in GL interface table.
Check if already journal exists in GL application.

Some important columns that need to be populated in the interface tables:
GL_INTERFACE:
STATUS
SET_OF_BOOKS_ID
ACCOUNTING_DATE
CURRENCY_CODE
DATE_CREATED
CREATED_BY
ACTUAL_FLAG
USER_JE_CATEGORY_NAME
USER_JE_SOURCE_NAME
CURRENCY_CONVERSION_DATE
ENCUMBRANCE_TYPE_ID
BUDGET_VERSION_ID
USER_CURRENCY_CONVERSION_TYPE
CURRENCY_CONVERSION_RATE
SEGMENT1 to
ENTERED_DR
ENTERED_CR
ACCOUNTED_DR
ACCOUNTED_CR
TRANSACTION_DATE
PERIOD_NAME
JE_LINE_NUM
CHART_OF_ACCOUNTS_ID
FUNCTIONAL_CURRENCY_CODE
CODE_COMBINATION_ID
DATE_CREATED_IN_GL

GROUP_ID

TUESDAY, DECEMBER 8, 2015

Oracle Custom WEB ADI Setups and Process for AP Invoice Interface

Introduction:
There are basically two ways to enter data into Oracle: by typing it into a user interface (Java Form or Web Page) or by taking a file and programmatically interfacing the data.  Web ADI falls into the second category in that it takes an Excel file and programmatically loads the data into Oracle.  If you find it easier to enter data into Excel than Oracle forms, you should look into using Web ADI.

Downloading a Web ADI
The first step in downloading a template is to locate the responsibility and menu that is linked to that template.  Some templates can be downloaded from the Desktop Integration menu and others must be downloaded from a specific responsibility.  For security, some templates are linked to specific responsibilities.  For example, we can download the GL Journals template from the Desktop Integration responsibility but we can’t download the Project Transaction Import template from the same responsibility.
To download a template you will use the following components: integrator, viewer, layout, and content. Based on how the menu is setup, some of these components may default for you.

Integrator
The integrator defines what data you will be uploading to Oracle.  Each integrator serves a specific purpose and cannot be used to enter other data.

Viewer
The viewer is the Microsoft program you will use to enter data into the template

Layout
The layout is how the data columns are organized on the template.  You have two main sections to a template: a header and lines.  The header information applies to all the lines when the data is uploaded to Oracle.

Content
The content is a text file that you can import into your template.  You can use this feature if you have an external system that outputs text file and you want to import that into the template.

Pre-requisites for working on Development or use of WEBADIs

1.Check the value for profile option named BNE Allow No Security Rule and set the value to Yes


2. ENABLE THE MACROS OPTIONS FOR YOUR EXCEL SHEET


Select Excel option to set the properties

Click on Trust Centre -> Trust center Settings

Select Macro Settings -> Enable all macros and check the option Trust access to the VBA Project object model

Apply and save your settings
Assign responsibility Oracle WEBADI or Desktop Integrator to do the development of new WEBADIs


Compile the below Custom table and Package in APPS schema
--> ====================================================================
DROP TABLE XXAA_APINV_IFACE_TBL;

CREATE TABLE XXAA_APINV_IFACE_TBL
  (
     SOURCE               VARCHAR2(50),
     ORGANIZATION         VARCHAR2(40),
     INVOICE_TYPE         VARCHAR2(40),
     SUPPLIER_NAME        VARCHAR2(60),
     SUPPLIER_NUM         VARCHAR2(60),
     SUPPLIER_SITE        VARCHAR2(40),
     INVOICE_DATE         DATE,
     INVOICE_NUMBER       VARCHAR2(60),
     INVOICE_AMOUNT       NUMBER(10,2),
     TERMS                VARCHAR2(60),
     INVOICE_CURRENCY     VARCHAR2(25),
     GL_DATE              DATE,
     PAYMENT_CURRENCY     VARCHAR2(25),
     PAYMENT_METHOD       VARCHAR2(40),
     LINE_NUM             NUMBER,
     LINE_TYPE            VARCHAR2(25),
     LINE_AMOUNT          NUMBER(10,2),
     SEGMENT1             VARCHAR2(25),
     SEGMENT2             VARCHAR2(25),
     SEGMENT3             VARCHAR2(25),
     SEGMENT4             VARCHAR2(25),
     SEGMENT5             VARCHAR2(25),
     LINE_DESCRIPTION     VARCHAR2(100),
     ORG_ID               NUMBER,
     VENDOR_ID            NUMBER,
     VENDOR_SITE_ID       NUMBER,
     TERM_ID              NUMBER,
     CODE_COMBINATION_ID  NUMBER,
     last_update_date     DATE,
     last_updated_by      NUMBER,
     creation_date        DATE,
     created_by           NUMBER,
     last_update_login    NUMBER ,
     status               VARCHAR2(50),
     error_code           VARCHAR2(15),
     error_message        VARCHAR2(3000)
  );

--> ====================================================================
CREATE OR REPLACE PACKAGE XXAA_APINV_IFACE_PKG
IS
PROCEDURE XXAA_APINV_IFACE_LOAD_PRC
     (
           P_SOURCE            VARCHAR2
           ,P_ORGANIZATION      VARCHAR2
           ,P_INVOICE_TYPE      VARCHAR2
           ,P_SUPPLIER_NAME     VARCHAR2
           ,P_SUPPLIER_NUM      VARCHAR2       
           ,P_SUPPLIER_SITE     VARCHAR2
           ,P_INVOICE_DATE      DATE
           ,P_INVOICE_NUMBER    VARCHAR2
           ,P_INVOICE_AMOUNT    NUMBER
           ,P_TERMS             VARCHAR2
           ,P_INVOICE_CURRENCY  VARCHAR2
           ,P_GL_DATE           DATE
           ,P_PAYMENT_CURRENCY  VARCHAR2
           ,P_PAYMENT_METHOD    VARCHAR2
           ,P_LINE_NUM          NUMBER
           ,P_LINE_TYPE         VARCHAR2
           ,P_LINE_AMOUNT       NUMBER
           ,P_LINE_DESCRIPTION  VARCHAR2
           ,P_SEGMENT1          VARCHAR2
           ,P_SEGMENT2          VARCHAR2
           ,P_SEGMENT3          VARCHAR2
           ,P_SEGMENT4          VARCHAR2
           ,P_SEGMENT5          VARCHAR2
     );
    
PROCEDURE XXAA_APINV_IFACE_IMPORT_PRC;
END XXAA_APINV_IFACE_PKG;
/

--> ====================================================================
CREATE OR REPLACE PACKAGE XXAA_APINV_IFACE_PKG
IS
PROCEDURE XXAA_APINV_IFACE_LOAD_PRC
     (
           P_SOURCE            VARCHAR2
           ,P_ORGANIZATION      VARCHAR2
           ,P_INVOICE_TYPE      VARCHAR2
           ,P_SUPPLIER_NAME     VARCHAR2
           ,P_SUPPLIER_NUM      VARCHAR2       
           ,P_SUPPLIER_SITE     VARCHAR2
           ,P_INVOICE_DATE      DATE
           ,P_INVOICE_NUMBER    VARCHAR2
           ,P_INVOICE_AMOUNT    NUMBER
           ,P_TERMS             VARCHAR2
           ,P_INVOICE_CURRENCY  VARCHAR2
           ,P_GL_DATE           DATE
           ,P_PAYMENT_CURRENCY  VARCHAR2
           ,P_PAYMENT_METHOD    VARCHAR2
           ,P_LINE_NUM          NUMBER
           ,P_LINE_TYPE         VARCHAR2
           ,P_LINE_AMOUNT       NUMBER
           ,P_LINE_DESCRIPTION  VARCHAR2
           ,P_SEGMENT1          VARCHAR2
           ,P_SEGMENT2          VARCHAR2
           ,P_SEGMENT3          VARCHAR2
           ,P_SEGMENT4          VARCHAR2
           ,P_SEGMENT5          VARCHAR2
     );
    
PROCEDURE XXAA_APINV_IFACE_IMPORT_PRC;
END XXAA_APINV_IFACE_PKG;
/

--> ====================================================================
CREATE OR REPLACE PACKAGE body XXAA_APINV_IFACE_PKG
IS
PROCEDURE XXAA_APINV_IFACE_LOAD_PRC
     (
           P_SOURCE            VARCHAR2
           ,P_ORGANIZATION      VARCHAR2
           ,P_INVOICE_TYPE      VARCHAR2
           ,P_SUPPLIER_NAME     VARCHAR2
           ,P_SUPPLIER_NUM      VARCHAR2       
           ,P_SUPPLIER_SITE     VARCHAR2
           ,P_INVOICE_DATE      DATE
           ,P_INVOICE_NUMBER    VARCHAR2
           ,P_INVOICE_AMOUNT    NUMBER
           ,P_TERMS             VARCHAR2
           ,P_INVOICE_CURRENCY  VARCHAR2
           ,P_GL_DATE           DATE
           ,P_PAYMENT_CURRENCY  VARCHAR2
           ,P_PAYMENT_METHOD    VARCHAR2
           ,P_LINE_NUM          NUMBER
           ,P_LINE_TYPE         VARCHAR2
           ,P_LINE_AMOUNT       NUMBER
           ,P_LINE_DESCRIPTION  VARCHAR2
           ,P_SEGMENT1          VARCHAR2
           ,P_SEGMENT2          VARCHAR2
           ,P_SEGMENT3          VARCHAR2
           ,P_SEGMENT4          VARCHAR2
           ,P_SEGMENT5          VARCHAR2
     )
IS
  l_error_message               VARCHAR2(3000);
  l_error_code                  VARCHAR2(2);
  l_org_id                      NUMBER;
  l_invoice_num                 VARCHAR2(60);
  l_vendor_id                   NUMBER;
  l_vendor_site_id              NUMBER;
  l_term_id                     NUMBER;
  l_code_combination_id         NUMBER;
   
BEGIN
  l_error_message := '';
  l_error_code    :='V';
   
  -->Organization Validation
  BEGIN
     l_org_id := NULL; 
    SELECT organization_id
    INTO l_org_id
    FROM hr_organization_units hou
    WHERE hou.name=P_ORGANIZATION;
  EXCEPTION
  WHEN no_data_found THEN
    l_error_message :=l_error_message||','||'Organization not defined ';
    l_error_code    :='E';
  WHEN too_many_rows THEN
    l_error_message :=l_error_message||','||'Too Many Records for Organization ';
    l_error_code    :='E';
  WHEN OTHERS THEN
    l_error_message :=l_error_message||','||'Other Errors with Organization '||SQLCODE ||sqlerrm;
    l_error_code    :='E';
  END;

  -->Invoice Number Validation
  BEGIN
     l_invoice_num := NULL;
    SELECT COUNT (api.invoice_num)
    INTO l_invoice_num
    FROM ap_invoices_all api
    WHERE UPPER(api.invoice_num) = UPPER(P_INVOICE_NUMBER);
    
     IF l_invoice_num > 0
     THEN
           l_error_message :=l_error_message||','||'Invoice number already exist in oracle ';
           l_error_code    :='E';
     END IF;
    
  EXCEPTION
  WHEN no_data_found THEN
    l_error_message :=l_error_message||','||'Error in validating the invoice number ';
    l_error_code    :='E';
  WHEN OTHERS THEN
    l_error_message :=l_error_message||','||'Other Errors with invoice number '||SQLCODE ||sqlerrm;
    l_error_code    :='E';
  END;
 
  -->Supplier Validation
  BEGIN
     l_vendor_id := NULL;
    SELECT vendor_id
    INTO l_vendor_id
    FROM ap_suppliers aps
    WHERE (UPPER(aps.vendor_name) = UPPER(P_SUPPLIER_NAME) OR UPPER(aps.segment1) = UPPER(P_SUPPLIER_NUM));
  EXCEPTION
  WHEN no_data_found THEN
    l_error_message :=l_error_message||','||'Supplier not defined ';
    l_error_code    :='E';
  WHEN too_many_rows THEN
    l_error_message :=l_error_message||','||'Too Many Records for Supplier ';
    l_error_code    :='E';
  WHEN OTHERS THEN
    l_error_message :=l_error_message||','||'Other Errors with Supplier '||SQLCODE ||sqlerrm;
    l_error_code    :='E';
  END;

  -->Supplier Site Validation
  BEGIN
     l_vendor_site_id := NULL;
    SELECT vendor_site_id
    INTO l_vendor_site_id
    FROM ap_supplier_sites_all ass
    WHERE ass.vendor_id = l_vendor_id
       AND ass.org_id = l_org_id
       AND UPPER(ass.vendor_site_code) = UPPER(P_SUPPLIER_SITE);
  EXCEPTION
  WHEN no_data_found THEN
    l_error_message :=l_error_message||','||'Supplier Site not defined ';
    l_error_code    :='E';
  WHEN too_many_rows THEN
    l_error_message :=l_error_message||','||'Too Many Records for Supplier Site ';
    l_error_code    :='E';
  WHEN OTHERS THEN
    l_error_message :=l_error_message||','||'Other Errors with Supplier Site '||SQLCODE ||sqlerrm;
    l_error_code    :='E';
  END;

  -->Terms Validation
  BEGIN
     l_term_id := NULL;
    SELECT term_id
    INTO l_term_id
    FROM ap_terms apt
    WHERE UPPER(apt.name) = UPPER(P_TERMS);
  EXCEPTION
  WHEN no_data_found THEN
    l_error_message :=l_error_message||','||'Terms not defined ';
    l_error_code    :='E';
  WHEN too_many_rows THEN
    l_error_message :=l_error_message||','||'Too Many Records for Terms ';
    l_error_code    :='E';
  WHEN OTHERS THEN
    l_error_message :=l_error_message||','||'Other Errors with Terms '||SQLCODE ||sqlerrm;
    l_error_code    :='E';
  END;
 
  -->Account segment Validation
  BEGIN
    SELECT code_combination_id
    INTO l_code_combination_id
    FROM gl_code_combinations
    WHERE segment1= P_SEGMENT1
    AND segment2  = P_SEGMENT2
    AND segment3  = P_SEGMENT3
    AND segment4  = P_SEGMENT4
    AND segment5  = P_SEGMENT5;
  EXCEPTION
  WHEN no_data_found THEN
    l_error_message :=l_error_message||','||'Invalid Flex field combination ';
    l_error_code    :='E';
  WHEN too_many_rows THEN
    l_error_message :=l_error_message||','||'Too Many Records for Flex field combination ';
    l_error_code    :='E';
  WHEN OTHERS THEN
    l_error_message :=l_error_message||','||'Other Errors with Flex field combination '||SQLCODE ||sqlerrm;
    l_error_code    :='E';
  END;
 
  -->Insert the data into the staging table
  INSERT INTO XXAA_APINV_IFACE_TBL
  (
   SOURCE                 
  ,ORGANIZATION     
  ,INVOICE_TYPE     
  ,SUPPLIER_NAME
  ,SUPPLIER_NUM 
  ,SUPPLIER_SITE          
  ,INVOICE_DATE     
  ,INVOICE_NUMBER         
  ,INVOICE_AMOUNT         
  ,TERMS                  
  ,INVOICE_CURRENCY 
  ,GL_DATE          
  ,PAYMENT_CURRENCY 
  ,PAYMENT_METHOD         
  ,LINE_NUM               
  ,LINE_TYPE              
  ,LINE_AMOUNT
  ,LINE_DESCRIPTION 
  ,SEGMENT1               
  ,SEGMENT2               
  ,SEGMENT3               
  ,SEGMENT4               
  ,SEGMENT5               
  ,ORG_ID                 
  ,VENDOR_ID              
  ,VENDOR_SITE_ID         
  ,TERM_ID          
  ,CODE_COMBINATION_ID
  ,last_update_date 
  ,last_updated_by  
  ,creation_date          
  ,created_by             
  ,last_update_login
  ,status                 
  ,error_code             
  ,error_message          
  )
  VALUES 
  (UPPER(P_SOURCE)
  ,P_ORGANIZATION   
  ,UPPER(P_INVOICE_TYPE)  
  ,P_SUPPLIER_NAME
  ,P_SUPPLIER_NUM
  ,P_SUPPLIER_SITE
  ,P_INVOICE_DATE   
  ,P_INVOICE_NUMBER
  ,P_INVOICE_AMOUNT
  ,P_TERMS
  ,P_INVOICE_CURRENCY
  ,P_GL_DATE
  ,P_PAYMENT_CURRENCY
  ,P_PAYMENT_METHOD
  ,P_LINE_NUM
  ,P_LINE_TYPE 
  ,P_LINE_AMOUNT    
  ,P_LINE_DESCRIPTION
  ,P_SEGMENT1
  ,P_SEGMENT2
  ,P_SEGMENT3
  ,P_SEGMENT4
  ,P_SEGMENT5
  ,L_ORG_ID                    
  ,L_VENDOR_ID            
  ,L_VENDOR_SITE_ID       
  ,L_TERM_ID              
  ,L_CODE_COMBINATION_ID
  ,sysdate
  ,fnd_global.user_id
  ,sysdate
  ,fnd_global.user_id
  ,fnd_global.login_id
  ,'NEW'
  ,l_error_code
  ,SUBSTR(l_error_message,2)
  );
 
  IF (l_error_code='E')
  THEN
    raise_application_error(-20101,SUBSTR(l_error_message,2));
  END IF;
 
EXCEPTION
WHEN OTHERS
THEN
  raise_application_error(-20102,'Error -'||SQLCODE||'-'||sqlerrm);
END XXAA_APINV_IFACE_LOAD_PRC;

--> --------------------------------------------------------------------
PROCEDURE XXAA_APINV_IFACE_IMPORT_PRC
IS
  CURSOR c_inv
  IS
    SELECT DISTINCT
     api.source,
      api.org_id,
      api.invoice_type,
      api.vendor_id,
      api.vendor_site_id,
      api.invoice_date,
      api.invoice_number,
      api.invoice_amount,
      api.term_id,
      api.invoice_currency,
      api.gl_date,
      api.payment_currency,
      api.payment_method
    FROM XXAA_APINV_IFACE_TBL api
    WHERE api.error_code='V'
     ORDER BY
       api.org_id,
       api.invoice_type,
       api.vendor_id,
       api.vendor_site_id,
       api.invoice_number;
      
  CURSOR c_lin(X_INVOICE_NUMBER VARCHAR2)
  IS
    SELECT
       apl.line_num,
      apl.line_type,
      apl.line_amount,
      apl.code_combination_id,
      apl.line_description
    FROM XXAA_APINV_IFACE_TBL apl
    WHERE apl.error_code='V'
       AND apl.invoice_number = X_INVOICE_NUMBER
     ORDER BY apl.line_num;    
          
  l_batch_name       VARCHAR2(100) := TO_CHAR(SYSDATE,'DD-MON-RR:HH24MISS');
  l_conc_request_id  NUMBER;
  l_phase            VARCHAR2(25);
  l_status           VARCHAR2(25);
  l_dev_phase        VARCHAR2(25);
  l_dev_status       VARCHAR2(25);
  l_message          VARCHAR2(500);
  l_request_status   BOOLEAN;
  l_count            NUMBER;
  l_inv_seq             NUMBER;
 
BEGIN

BEGIN

  FOR r_inv IN c_inv
  LOOP
 
     select ap_invoices_interface_s.NEXTVAL into l_inv_seq from dual;
      
    INSERT INTO AP_INVOICES_INTERFACE
      (
           invoice_id,
           source,
           org_id ,
           invoice_type_lookup_code,
           vendor_id,
           vendor_site_id,
           invoice_date,
           invoice_num,
           invoice_amount,
           terms_id,
           invoice_currency_code,
           gl_date,
           payment_currency_code,
           payment_method_lookup_code
      )
      VALUES
      (
        l_inv_seq,
       r_inv.source,
        r_inv.org_id,
        r_inv.invoice_type,
        r_inv.vendor_id,
        r_inv.vendor_site_id,
        r_inv.invoice_date,
        r_inv.invoice_number,
        r_inv.invoice_amount,
        r_inv.term_id,
        r_inv.invoice_currency,
        r_inv.gl_date,
        r_inv.payment_currency,
        r_inv.payment_method
      );
 
       FOR r_lin IN c_lin(r_inv.invoice_number)
       LOOP
           INSERT INTO AP_INVOICE_LINES_INTERFACE
             (
                invoice_id,
                invoice_line_id,
                line_number,
                line_type_lookup_code,
                amount,
                dist_code_combination_id,
                description
             )
             VALUES
             (
                l_inv_seq,
                ap_invoice_lines_interface_s.NEXTVAL,
                r_lin.line_num,
                r_lin.line_type,
                r_lin.line_amount,
                r_lin.code_combination_id,
                r_lin.line_description
             );
       END LOOP;
  END LOOP;

  COMMIT;
END;

  l_conc_request_id := FND_REQUEST.SUBMIT_REQUEST
                                   (  APPLICATION   => 'SQLAP' 
                                     ,PROGRAM     => 'APXIIMPT'
                                     ,ARGUMENT1    => '204'
                                     ,ARGUMENT2    => 'MANUAL INVOICE ENTRY'
                                     ,ARGUMENT4    => l_batch_name
                                   );                                       
  
  COMMIT;
 
  l_request_status := FND_CONCURRENT.WAIT_FOR_REQUEST
                                     (
                                           l_conc_request_id,
                                           60,
                                           0,
                                           l_phase,
                                           l_status,
                                           l_dev_phase,
                                           l_dev_status,
                                           l_message
                                     );
 
  COMMIT;
EXCEPTION
WHEN OTHERS
THEN
  raise_application_error(-20103,'Error -'||SQLCODE||'-'||sqlerrm);
END XXAA_APINV_IFACE_IMPORT_PRC;

END XXAA_APINV_IFACE_PKG;
/
--> ====================================================================


Integrator
1. Create Integrator
Navigation : Desktop Integration Manager Responsibility-> Create Integrator

Integrator Name       : XXAA APINV Interface Integrator
Internal Name           : XXAA_APINV_IFACE_INTEGRATOR
Application                : Payables
Click on Next button

2. Create Interface
Interface Name           : XXAA APINV Interface
Interface Type             : API – Procedure
Package Name            : XXAA_APINV_IFACE_PKG
Procedure/Funtion    : XXAA_APINV_IFACE_LOAD_PRC
API Returns                : FND Message Code
Click on Apply button

Select the Interface and Click on Next button

3. Create Content
Content Name                       : XXAA APINV Interface Content
Content Type             : Text File
Number of columns   : 9
Apply


Rename the display names as per csv header columns for better under standing
And provide the content parameter (download parameter) as Web ADI: Download "Text File" Parameters

4. Create Uploader


5. Create Importer
Select importer type as PL/SQL API
Importer Name                      : XXAA_APINV_IFACE

Click on PL/SQL API Call plus button to add our custom procedure

Enter following information
API Type                    : PL/SQL Procedure
Package Name           : XXAA_APINV_IFACE_PKG
Procedure Name        : XXAA_APINV_IFACE_IMPORT_PRC
API Returns                : FND Message Code
Click on apply and then submit button


Layout
1.                  Create Layout
Navigation: Desktop Integration Responsibility àDefine Layout
Select the integrator àGo àCreate button

2.                  Enter the name           : XXAA APINV Interface Layout

3.                  Include the fields in layout, Select the line in Placement

Click on Apply button


2. Define Mapping
1.                  Define mapping
Navigation: Desktop Integration Responsibility -> Defining mapping-> select integrator-> go

2.                  Click on define mapping button

3.                  Enter the mapping details
Mapping Name         : XXAA APINV Interface Mapping
Mapping Key             : XXAA_APINV_IFACE_MAPPING
Number of column    : 9

4.                  Map the source and target columns


3. Create Document
1.                  Create Document :- Test the document with sample data
Navigation: Desktop Integration Responsibility -> Create Document -> select integrator

2.                  Select the desktop application like excel or word

3.                  Select the layout if there are multiple layouts
4.                  Select the content

5.                  Select the data file

6.                  Select the NONE to open the Excel file

7.                  Click on create document button

8.                  Click on create document button to download the sheet


Enter the data and upload and verify the invoice number from application

Note: we have developed the sheet. Now it needs some cosmetic changes


Changes
1.                  Change the Labels of fields
Navigation: Go to integrator-> Interface-> Enter the Integrator name and click on Go

Click on Update button

Click on Next

Select the Integrator

Change the Prompt Left Label
  
Click on the Update button and change Above Prompt then Save and Submit

è    Create the document to check new changes

2.                  Assign LOV and hints to the columns
Navigation: Go to integrator-> Interface->click on update button of respective attribute (say P_INVOICE_CURRENCY) to add LOV
check the not null check box to indicate required columns in spread sheet
Select the validation type as table and enter below information
Validation Type                     : Table
Id Column                  : CURRENCY_CODE
Meaning Column       : CURRENCY_CODE
Desc Column              : CURRENCY_CODE
Validation Entity        : FND_CURRENCIES

Provide the information under user hint text item as ‘*List–Text’ to give an idea user about what value should be entered or select

è    Do the same for other columns too then save and get the new document to see the changes

3.                  Add default value as ‘USD’ to currency code item
Navigation: Go to integrator-> Interface-> select the default type and default value for currency code attribute

Do the changes for all required fields

Result


Defining the Form Function for Integrator
Define the form function for integrator to run the custom ADI document from any responsibility

1.                  Define the custom Form Function
Navigation -> Application Developer -> Application -> Function

Function                     : XXAA_APINV_IFACE_FF
User Function Name : XXAA APINV Interface Integrator

Properties àType - SSWA servlet function

Form àParameters
bne:page=BneCreateDoc&bne:viewer=BNE:EXCEL2007&bne:reporting=N&bne:integrator=USER_NAME:XXAA APINV Interface Integrator&bne:noreview=Yes

Web HTML àHTML Call : BneApplicationService

Save it.

Assign Function to Custom Menu
Go and add the function into the custom responsibility
Navigation-> Application Developer -> Application -> Menu

Search for your menu where you want to add this ADI
Menu              : AP_NAVIGATE_GUI12
Prompt            : XXAA APINV Interface Integrator
Function         : XXAA APINV Interface Integrator

Now you can navigate to your custom responsibility to see the ADI which you have assigned.


Test the sheet
1.                  Once you create document, it will populate the file data on the sheet

2.                  Fill the required information

3.                  Upload the data into oracle
Navigation: Add-Ins Tab-> Oracle-> Upload

4.                  Once we click on upload button, it will pop up the upload page where we have to select ‘Automatically Submit Import’ check box as we have added import procedure in importer rule. If it is checked then only it will call that import program, otherwise it wont


5.                  If there is any error, then program will return error message and will rollback the transaction

6.                  After correcting the data, run again. And if there is no error, then program will insert all validated data into oracle tables and call the import journal program

Click on Upload button

Wait until Import program completed


7.                  We can monitor the import program from spread sheet itself by clicking on monitor button
Click on the Monitor to check the request id
Nav : Add-Ins àOracle àMonitor


Verify the concurrent request id from application

Click on View Output button


Search with Invoice number from payables responsibility


Check the from the backend tables